We are expanding!
We recently received our Retail License for meat! We are starting with Longhorn Beef and may have other options in the future.
As soon as we can get into a commercial kitchen we can sell our canned goods as retail as well!
So here's the start. If there is anything you want let us know!
Sunday, September 17, 2017
Sunday, May 7, 2017
Planting Early
Greetings Friends of Opdahl Gardens
We were away from the blog for quite a while but have come back!
We have been taking advantage of the early warm weather and have been busy planting.
Cabbage, Corn, Beets, Radishes and Pole Beans are in the ground.
We also planted out our pea pods. This year we tried a trick we saw at
https://www.facebook.com/HuwsGardenNursery/ for how to plant peas in 60 seconds.
This uses rain gutters and then they transplant directly into the garden when sprouted. It was slick and rather fun...I see the purchase of rain gutters in our future! (The peas on the left are gutter peas, the rest were hand planted.
Our first Market of the year will be at Tractor Supply on Harvey on May 13th. We will have canned goods from the end of season last year.
Our first Market at North Prairie Farmer's Market will be July 8th - hope to see you there!
We were away from the blog for quite a while but have come back!
We have been taking advantage of the early warm weather and have been busy planting.
Cabbage, Corn, Beets, Radishes and Pole Beans are in the ground.
We also planted out our pea pods. This year we tried a trick we saw at
https://www.facebook.com/HuwsGardenNursery/ for how to plant peas in 60 seconds.
This uses rain gutters and then they transplant directly into the garden when sprouted. It was slick and rather fun...I see the purchase of rain gutters in our future! (The peas on the left are gutter peas, the rest were hand planted.
Our first Market of the year will be at Tractor Supply on Harvey on May 13th. We will have canned goods from the end of season last year.
Our first Market at North Prairie Farmer's Market will be July 8th - hope to see you there!
Monday, September 22, 2014
New Additions
Kent and I did a little road-tripping today to expand our flock.
We brought home 20 straight run Icelandic Chicks.
Icelandic chickens come directly from Iceland. Called íslenska hænan or landnámshænan in the Icelandic language, they are a landrace fowl which are rare or non-existent outside their native country. They are an old breed of chicken, having been present on the island since introduction by Norse settlers in the 9th century. However, despite this isolation, the breed has barely survived in a pure form in the 21st century, largely due to the importation of commercial strains of chickens in the 1950s. The few thousand Icelandic chickens in existence today are the result of conservation efforts in the 1970s; a handful of flocks have been exported abroad.
Icelandic chickens are not firmly standardized in appearance and possess a wide range of plumage colors and patterns, skin coloration and comb types. Some have feather crests.
Despite this variance in appearance, Icelandic chickens are uniformly hardy in winter, have white earlobes, and lay white eggs. They are also said to be docile in temperament, and hens will readily go broody.
Our flock add-ons are decendants of the Mack Hill Farms Flock (mackhillfarm.com)
We are excited to add these little beauties!
There is a nice little article about Icelandics here: (Which is also where I found the picture)
http://www.motherearthnews.com/homesteading-and-livestock/icelandic-chickens-zm0z14onzkin.aspx?PageId=1#axzz3E0fAUfNr
Saturday, August 9, 2014
Monday, August 4, 2014
Beets, Bacon, Cheese! What could be better!
Stuffed Beets
|
![]() |
Submitted By: BRENT
Photo By: Brent
|
"Tender beets are hollowed out and filled with a savory mixture of Gruyere and Parmesan cheeses and smoky bacon, then baked until bubbling."
INGREDIENTS:
4 large beets
1 (12 ounce) package bacon
1/2 cup shredded Gruyere cheese
1/4 cup grated Parmesan cheese
|
1/4 cup sour cream
2 tablespoons chopped garlic
1 teaspoon garlic salt
ground black pepper to taste
|
DIRECTIONS:
| 1. | Place the beets into a large pot and cover with water. Bring to a boil over high heat, then reduce heat to medium-low, cover, and simmer until tender and skin slides off, about 20 minutes. Drain and allow to cool, then remove skin, and cut off roots and stems so that both ends are flat. Scoop out the inside of the beets using a melon baller or spoon, leaving about 1/4-inch on the sides and bottom. Set the hollowed beet cups aside. |
| 2. | While the beets are cooking, place the bacon in a large, deep skillet, and cook over medium-high heat, turning occasionally, until evenly browned, about 10 minutes. Drain the bacon slices on a paper towel-lined plate, then crumble. |
| 3. | Preheat an oven to 350 degrees F (175 degrees C). |
| 4. | Dice the remaining chunks of beets, and place in a large bowl. Mix in the Gruyere cheese, Parmesan cheese, sour cream, crumbled bacon, garlic, garlic salt, and pepper until well combined. Gently fill each beet cup with the cheese mixture. Place filled beets in a shallow baking dish. |
| 5. | Bake in the preheated oven until the cheese melts and is heated through, 20 to 30 minutes. This recipe and many more can be found on allrecipes.com |
A Twist with Cabbage
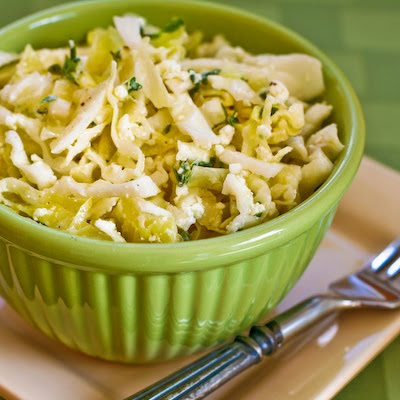
Greek Cabbage Salad with Feta and Fresh Thyme
(Makes 4-6 servings, recipe adapted slightly from Greek Cabbage Salad at Culinate.)
1/2 large head or 1 small head green cabbage, very thinly sliced
4 T extra virgin olive oil (I used Greek olive oil)
3 T red wine vinegar
4 oz. crumbled Feta Cheese (3/4 cup feta, loosely packed)
2 - 3 T fresh thyme leaves
Remove the core from the cabbage, then use a mandoline or sharp chef's knife to thinly slice cabbage, chopping strips in half if desired. Put chopped cabbage into a plastic or glass bowl.
Whisk together the olive oil and red wine vinegar, tasting to see if you'd like a bit more oil or vinegar to suit your preference. When the ratio of oil to vinegar seems right to you, stir the dressing into the sliced cabbage. (You may not want all the dressing, depending on how large your cabbage was.)
Crumble feta and measure to get 3/4 cup crumbled feta, or more. Wash thyme, spin dry or dry with paper towel, then strip thyme leaves from stems until you have 2-3 T fresh thyme leaves. Add thyme and feta to cabbage mixture and gently combine.
Season to taste with fresh-ground black pepper. Salad can be served immediately or allowed to wilt for a few hours in the fridge before serving.
I liked this salad best when it was served within 30 minutes of combining ingredients because I like the crunch of cabbage, but it still tasted pretty good even after being refrigerated overnight.
This printable recipe from KalynsKitchen.com.
1/2 large head or 1 small head green cabbage, very thinly sliced
4 T extra virgin olive oil (I used Greek olive oil)
3 T red wine vinegar
4 oz. crumbled Feta Cheese (3/4 cup feta, loosely packed)
2 - 3 T fresh thyme leaves
Remove the core from the cabbage, then use a mandoline or sharp chef's knife to thinly slice cabbage, chopping strips in half if desired. Put chopped cabbage into a plastic or glass bowl.
Whisk together the olive oil and red wine vinegar, tasting to see if you'd like a bit more oil or vinegar to suit your preference. When the ratio of oil to vinegar seems right to you, stir the dressing into the sliced cabbage. (You may not want all the dressing, depending on how large your cabbage was.)
Crumble feta and measure to get 3/4 cup crumbled feta, or more. Wash thyme, spin dry or dry with paper towel, then strip thyme leaves from stems until you have 2-3 T fresh thyme leaves. Add thyme and feta to cabbage mixture and gently combine.
Season to taste with fresh-ground black pepper. Salad can be served immediately or allowed to wilt for a few hours in the fridge before serving.
I liked this salad best when it was served within 30 minutes of combining ingredients because I like the crunch of cabbage, but it still tasted pretty good even after being refrigerated overnight.
This printable recipe from KalynsKitchen.com.

KalynsKitchen.com has step by step pictures for this recipe...check it out!
Cheesy Zucchini - Yummy!
Cheesy Zucchini with Garlic and Parsley
(Makes two servings, can be doubled or tripled, recipe adapted slightly from Food to Live By.)
2-3 small zucchini, cut into 1/2 inch thick slices (if zucchini are large, cut in half or fourths lengthwise, then slice)
1 T olive oil
4-6 large garlic cloves, thinly sliced
pinch sea salt
2 T chopped flat parsley
2 T grated parmesan
1/4 cup grated mozzarella
With stove set to medium, heat the olive oil in a large frying pan with a lid. Add sliced garlic and saute about 1 minute, until you start to smell garlic. Add squash and stir to coat with oil, then cover and cook 4 minutes, stirring once or twice. After 4 minutes, check to see if there is a lot of liquid and whether squash is tender. Cook 1-2 more minutes, uncovered until zucchini is tender-crisp and liquid is evaporated.
Sprinkle squash with salt and chopped parsley and stir to wilt parsley. Add parmesan and stir until it melts, about 1 minute. Sprinkle mozzarella cheese over the squash, cover pan again and turn off the heat. Let sit 1-2 minutes until cheese is melted and serve hot.
This printable recipe from KalynsKitchen.com.
2-3 small zucchini, cut into 1/2 inch thick slices (if zucchini are large, cut in half or fourths lengthwise, then slice)
1 T olive oil
4-6 large garlic cloves, thinly sliced
pinch sea salt
2 T chopped flat parsley
2 T grated parmesan
1/4 cup grated mozzarella
With stove set to medium, heat the olive oil in a large frying pan with a lid. Add sliced garlic and saute about 1 minute, until you start to smell garlic. Add squash and stir to coat with oil, then cover and cook 4 minutes, stirring once or twice. After 4 minutes, check to see if there is a lot of liquid and whether squash is tender. Cook 1-2 more minutes, uncovered until zucchini is tender-crisp and liquid is evaporated.
Sprinkle squash with salt and chopped parsley and stir to wilt parsley. Add parmesan and stir until it melts, about 1 minute. Sprinkle mozzarella cheese over the squash, cover pan again and turn off the heat. Let sit 1-2 minutes until cheese is melted and serve hot.
This printable recipe from KalynsKitchen.com.
Lemon-Butter Snow Peas!
Lemon-Butter Snow Peas

2 ServingsPrep/Total Time: 10 min.
Ingredients
- 1/2 pound fresh snow peas
- 1 tablespoon water
- 1 teaspoon minced garlic
- 1 tablespoon butter, melted
- 1 teaspoon lemon juice
- 1/2 teaspoon Italian seasoning
Directions
- In a microwave-safe dish, combine the snow peas, water and garlic.
- Cover and microwave on high for 3-4 minutes or until crisp-tender;
- drain. Combine the butter, lemon juice and Italian seasoning.
- Drizzle over peas; toss to coat.
- Yield: 2 servings.
Editor’s Note: This recipe was tested in an 1,100 watt microwave.
Nutritional Facts: 1 serving (prepared with reduced-fat butter) equals 76 calories, 3 g fat (2 g saturated fat), 10 mg cholesterol, 40 mg sodium, 9 g carbohydrate, 3 g fiber, 4 g protein. Diabetic Exchanges: 2 vegetable, 1/2 fat.
Read more: http://www.tasteofhome.com/recipes/lemon-butter-snow-peas#ixzz39QeGrzn8
Monday, July 28, 2014
Tuesday, March 18, 2014
Community Supported Agriculture
Community
Supported Agriculture
Membership
Agreement
between Opdahl Gardens
and ____________________________________________________________
(Please print your
name(s) here)
This membership agreement pertains to the market season of
2014: from May 1st to October 15th. By filling out and signing this
form you will become a member of the Opdahl Gardens (OG) CSA. This agreement
will grant the exchange of resources between CSA members and OG. Members will
provide capital and/or (under special circumstances) labor resources in
exchange for garden produce, honey and/or any product available from OG.
Purpose
To engage with one another in a mutually beneficial
relationship that ensures the sustainability and prosperity of local food
production on our farm and the availability of wholesome food and a connection
to agrarian traditions for the community.
The Other Purpose
The concept of CSA grew out of a need for farmers to gain
access to capital during a time of year when they are not earning very much. By
acquiring up-front “seed money” from known customers, it gives the farmer an
opportunity to remain (relatively) un-indebted to banks. Instead, the farmer is
indebted to his/her members, who are repaid with the fruits of the farmer’s
labor. Without access to this seed money, small-scale farming would be even
more challenging, and we would not know you nearly as well!
Terms
OG will provide vegetables, fruit, honey and other products
at North Prairie Farmers’ Market, Harvey Farmers’ Market, by special delivery
arrangement or from the farm to all its CSA members during the main farmers’
market season (May 1st to
October 15th) in exchange for a contribution starting at $100 in $100
increments, dependent on the members expected need. For their contribution, members
will receive an equal amount of credit redeemable for OG products. Credit will
be tracked by OG at the point of sale.
10% of contribution will be added to the customer credit (IE. $500 membership = $550 customer credit).
OG will produce several vegetable varieties and a few fruit
varieties during the growing season. However, the weekly availability of
vegetables and fruits will vary due to the climate, biology, and other
unpredictable variables. OG cannot promise the delivery of any certain item on
any specific date far in advance of market. Members will receive an electronic
mailing of product availability 1-2 days before each market or can call for
availability of products. Products may
be reserved by contacting OG in advance, however reserved products not picked
up by the end of the market will be charged to the members account. Members not reserving product will be
expected to shop for products along with the general public, and products will
be sold on a first-come-first-serve basis. It should be noted that members are
not obligated to purchase anything during any given week of the market season. However,
it is up to you to spend all of your purchased credit before the last Farmers’
Market Day in 2014. Any remaining credit will not be refunded! CSA
Form 2013
Member Information
I have read all of the above and understand
the membership agreement.
[Please fill out the following contact
information (Please print and make legible) and send signed agreement with your
check to the address below].
Name:
_______________________________________________________________________
Address:
____________________________________________________________________
Phone Number(s):
_________________________________________________________
Email:
_______________________________________________________________________
Signature:
__________________________________________________________________
Date:
________________________________________________________________________
Amount of contribution
($100 increments) $ ________________________________________
Thank you for supporting Opdahl Gardens. If
you have any questions or concerns, please contact us. We look forward to
working with you over the course of this market season!
Kent and
Angel Opdahl - 701-341-7230
Suggestions for vegetables you would be interested in
purchasing in the 2014 farming season.
Thursday, August 15, 2013
This looks yummy!
Cabbage and Noodles
|
![]() |
Submitted By: LissieKat
Photo By: Roxie
|
"Cabbage and noodles, cooked with bacon, is comfort food supreme, great for a chilly day."
Ingredients:
1 (8 ounce) package egg noodles
3 tablespoons butter
1/2 pound bacon
|
1 onion, chopped
1 small head cabbage, chopped
1 dash garlic salt
|
Directions:
| 1. | Fill a large pot with lightly salted water and bring to a rolling boil over high heat. Stir in the egg noodles; return to a boil. Cook, uncovered, stirring occasionally, until the noodles are cooked through, but still firm to the bite, about 5 minutes. Drain; return to the pot and stir in the butter. |
| 2. | Meanwhile, place the bacon in a large, deep skillet, and cook over medium-high heat, turning occasionally, until evenly browned, about 10 minutes. Drain the bacon slices on a paper towel-lined plate. |
| 3. | Place the onion into the skillet with the bacon grease, and cook and stir over medium heat until the onion begins to soften, about 2 minutes. Stir in the cabbage, and cook and stir until wilted, about 5 minutes. Chop the bacon, add it to the skillet, and cook until the cabbage is tender, about 10 minutes. Stir in the noodles, and continue cooking just until heated through. |
Thursday, August 8, 2013
Capitol Market
It's been a good week of advertising for Opdahl Gardens and Farmers' Markets during Farmers' Market week.
Check out the news story that we got to be a part of!
Farmers Market Week - KXNet - Bismarck/Minot/Williston/Dickinson
Check out the news story that we got to be a part of!
Farmers Market Week - KXNet - Bismarck/Minot/Williston/Dickinson
Wednesday, August 7, 2013
Tuesday, July 30, 2013
Celery Stir Fry
Japanese-style stir-fry, thin batons of celery, stir-fried with chili-infused oil and soy sauce.
We found the best way to julienne the celery is to slice off the root end and any part of the celery beyond the main stalk. Cut the stalks in thirds, or if they are very long, quarters, and then cut each of those pieces in half lengthwise. This gives you a manageable, flat surface to slice into matchsticks. Nancy's original recipe calls for using a high quality rapeseed oil (another name for canola oil) and/or light sesame oil. We added a little dark sesame oil at the finish which was just lovely, so you might want to try that too.
- Prep time: 10 minutes
- Cook time: 5 minutes
Ingredients
- 2 Tbsp high quality rapeseed oil (canola oil) or light sesame oil
- 3 dried chile peppers, broken in half
- 4 cups julienned celery
- 1-2 Tbsp soy sauce (to taste)
Method


Heat the oils and chiles in a wok or frying pan over high heat for 90 seconds, or until the chiles become fragrant and the seeds sizzle. Add the celery and stir-fry for 3 minutes. Add the soy sauce and stir-fry one more minute. Serve hot or at room temperature.
Yield: Serves 6 as a side dish.
Click on the comments you'd like to print with your recipe. Grayed out comments will not print.
Print
(Ads will not print.)
Comments
Subscribe to:
Posts (Atom)


It would be a great side for Asian dishes, of course. Or just a side for chicken or steak. Anything that tastes good with soy sauce and sesame. ~Elise
Hi Emily, Sometimes when you work with large, tough, outer ribs of celery, it helps to peel the outer side of them to remove the strings. I don’t remember doing that with this celery, probably because we had already used the outer ribs for some other dish. ~Elise
Sure, you can cook celery this way. It won’t have the extra flavor of the soy sauce and sesame though. If you try it plain like you suggested, please let us know how you like it. ~Elise
Nancy uses either high quality rapeseed oil (canola oil) or a light sesame oil. I think that we used rapeseed oil and then added a little dark sesame oil at the finish, just to get a little more sesame flavor. ~Elise
Hmm. Soy sauce can really be variable in its saltiness. I’ll adjust the recipe to say 1 – 2 Tbsp (to taste). Thank you for the feedback! ~Elise
I do think it’s weird that some people look at what to me is obviously a photo of a red chili and see it not as a chili, but as an insect. The chilies are not optional. That said, they do grow and sell chili roasted grasshoppers in Oaxaca, Mexico which are quite delicious, in a crunchy, spicy way. Feel free to add those if you have them. Me, I’ll pass. :-p ~Elise
looks like a great recipe! Would it work if I used fresh chili peppers instead of dried ones?