Greetings Friends of Opdahl Gardens
We were away from the blog for quite a while but have come back!
We have been taking advantage of the early warm weather and have been busy planting.
Cabbage, Corn, Beets, Radishes and Pole Beans are in the ground.
We also planted out our pea pods. This year we tried a trick we saw at
https://www.facebook.com/HuwsGardenNursery/ for how to plant peas in 60 seconds.
This uses rain gutters and then they transplant directly into the garden when sprouted. It was slick and rather fun...I see the purchase of rain gutters in our future! (The peas on the left are gutter peas, the rest were hand planted.
Our first Market of the year will be at Tractor Supply on Harvey on May 13th. We will have canned goods from the end of season last year.
Our first Market at North Prairie Farmer's Market will be July 8th - hope to see you there!
Sunday, May 7, 2017
Monday, September 22, 2014
New Additions
Kent and I did a little road-tripping today to expand our flock.
We brought home 20 straight run Icelandic Chicks.
Icelandic chickens come directly from Iceland. Called íslenska hænan or landnámshænan in the Icelandic language, they are a landrace fowl which are rare or non-existent outside their native country. They are an old breed of chicken, having been present on the island since introduction by Norse settlers in the 9th century. However, despite this isolation, the breed has barely survived in a pure form in the 21st century, largely due to the importation of commercial strains of chickens in the 1950s. The few thousand Icelandic chickens in existence today are the result of conservation efforts in the 1970s; a handful of flocks have been exported abroad.
Icelandic chickens are not firmly standardized in appearance and possess a wide range of plumage colors and patterns, skin coloration and comb types. Some have feather crests.
Despite this variance in appearance, Icelandic chickens are uniformly hardy in winter, have white earlobes, and lay white eggs. They are also said to be docile in temperament, and hens will readily go broody.
Our flock add-ons are decendants of the Mack Hill Farms Flock (mackhillfarm.com)
We are excited to add these little beauties!
There is a nice little article about Icelandics here: (Which is also where I found the picture)
http://www.motherearthnews.com/homesteading-and-livestock/icelandic-chickens-zm0z14onzkin.aspx?PageId=1#axzz3E0fAUfNr
Saturday, August 9, 2014
Monday, August 4, 2014
Beets, Bacon, Cheese! What could be better!
Stuffed Beets
|
![]() |
Submitted By: BRENT
Photo By: Brent
|
"Tender beets are hollowed out and filled with a savory mixture of Gruyere and Parmesan cheeses and smoky bacon, then baked until bubbling."
INGREDIENTS:
4 large beets
1 (12 ounce) package bacon
1/2 cup shredded Gruyere cheese
1/4 cup grated Parmesan cheese
|
1/4 cup sour cream
2 tablespoons chopped garlic
1 teaspoon garlic salt
ground black pepper to taste
|
DIRECTIONS:
| 1. | Place the beets into a large pot and cover with water. Bring to a boil over high heat, then reduce heat to medium-low, cover, and simmer until tender and skin slides off, about 20 minutes. Drain and allow to cool, then remove skin, and cut off roots and stems so that both ends are flat. Scoop out the inside of the beets using a melon baller or spoon, leaving about 1/4-inch on the sides and bottom. Set the hollowed beet cups aside. |
| 2. | While the beets are cooking, place the bacon in a large, deep skillet, and cook over medium-high heat, turning occasionally, until evenly browned, about 10 minutes. Drain the bacon slices on a paper towel-lined plate, then crumble. |
| 3. | Preheat an oven to 350 degrees F (175 degrees C). |
| 4. | Dice the remaining chunks of beets, and place in a large bowl. Mix in the Gruyere cheese, Parmesan cheese, sour cream, crumbled bacon, garlic, garlic salt, and pepper until well combined. Gently fill each beet cup with the cheese mixture. Place filled beets in a shallow baking dish. |
| 5. | Bake in the preheated oven until the cheese melts and is heated through, 20 to 30 minutes. This recipe and many more can be found on allrecipes.com |
A Twist with Cabbage
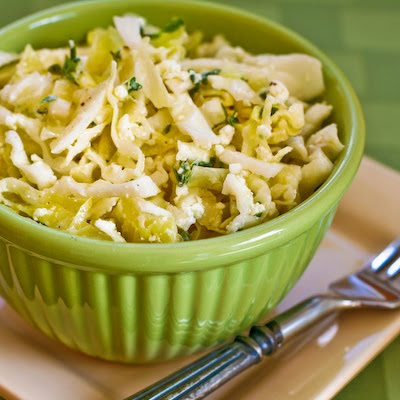
Greek Cabbage Salad with Feta and Fresh Thyme
(Makes 4-6 servings, recipe adapted slightly from Greek Cabbage Salad at Culinate.)
1/2 large head or 1 small head green cabbage, very thinly sliced
4 T extra virgin olive oil (I used Greek olive oil)
3 T red wine vinegar
4 oz. crumbled Feta Cheese (3/4 cup feta, loosely packed)
2 - 3 T fresh thyme leaves
Remove the core from the cabbage, then use a mandoline or sharp chef's knife to thinly slice cabbage, chopping strips in half if desired. Put chopped cabbage into a plastic or glass bowl.
Whisk together the olive oil and red wine vinegar, tasting to see if you'd like a bit more oil or vinegar to suit your preference. When the ratio of oil to vinegar seems right to you, stir the dressing into the sliced cabbage. (You may not want all the dressing, depending on how large your cabbage was.)
Crumble feta and measure to get 3/4 cup crumbled feta, or more. Wash thyme, spin dry or dry with paper towel, then strip thyme leaves from stems until you have 2-3 T fresh thyme leaves. Add thyme and feta to cabbage mixture and gently combine.
Season to taste with fresh-ground black pepper. Salad can be served immediately or allowed to wilt for a few hours in the fridge before serving.
I liked this salad best when it was served within 30 minutes of combining ingredients because I like the crunch of cabbage, but it still tasted pretty good even after being refrigerated overnight.
This printable recipe from KalynsKitchen.com.
1/2 large head or 1 small head green cabbage, very thinly sliced
4 T extra virgin olive oil (I used Greek olive oil)
3 T red wine vinegar
4 oz. crumbled Feta Cheese (3/4 cup feta, loosely packed)
2 - 3 T fresh thyme leaves
Remove the core from the cabbage, then use a mandoline or sharp chef's knife to thinly slice cabbage, chopping strips in half if desired. Put chopped cabbage into a plastic or glass bowl.
Whisk together the olive oil and red wine vinegar, tasting to see if you'd like a bit more oil or vinegar to suit your preference. When the ratio of oil to vinegar seems right to you, stir the dressing into the sliced cabbage. (You may not want all the dressing, depending on how large your cabbage was.)
Crumble feta and measure to get 3/4 cup crumbled feta, or more. Wash thyme, spin dry or dry with paper towel, then strip thyme leaves from stems until you have 2-3 T fresh thyme leaves. Add thyme and feta to cabbage mixture and gently combine.
Season to taste with fresh-ground black pepper. Salad can be served immediately or allowed to wilt for a few hours in the fridge before serving.
I liked this salad best when it was served within 30 minutes of combining ingredients because I like the crunch of cabbage, but it still tasted pretty good even after being refrigerated overnight.
This printable recipe from KalynsKitchen.com.

KalynsKitchen.com has step by step pictures for this recipe...check it out!
Cheesy Zucchini - Yummy!
Cheesy Zucchini with Garlic and Parsley
(Makes two servings, can be doubled or tripled, recipe adapted slightly from Food to Live By.)
2-3 small zucchini, cut into 1/2 inch thick slices (if zucchini are large, cut in half or fourths lengthwise, then slice)
1 T olive oil
4-6 large garlic cloves, thinly sliced
pinch sea salt
2 T chopped flat parsley
2 T grated parmesan
1/4 cup grated mozzarella
With stove set to medium, heat the olive oil in a large frying pan with a lid. Add sliced garlic and saute about 1 minute, until you start to smell garlic. Add squash and stir to coat with oil, then cover and cook 4 minutes, stirring once or twice. After 4 minutes, check to see if there is a lot of liquid and whether squash is tender. Cook 1-2 more minutes, uncovered until zucchini is tender-crisp and liquid is evaporated.
Sprinkle squash with salt and chopped parsley and stir to wilt parsley. Add parmesan and stir until it melts, about 1 minute. Sprinkle mozzarella cheese over the squash, cover pan again and turn off the heat. Let sit 1-2 minutes until cheese is melted and serve hot.
This printable recipe from KalynsKitchen.com.
2-3 small zucchini, cut into 1/2 inch thick slices (if zucchini are large, cut in half or fourths lengthwise, then slice)
1 T olive oil
4-6 large garlic cloves, thinly sliced
pinch sea salt
2 T chopped flat parsley
2 T grated parmesan
1/4 cup grated mozzarella
With stove set to medium, heat the olive oil in a large frying pan with a lid. Add sliced garlic and saute about 1 minute, until you start to smell garlic. Add squash and stir to coat with oil, then cover and cook 4 minutes, stirring once or twice. After 4 minutes, check to see if there is a lot of liquid and whether squash is tender. Cook 1-2 more minutes, uncovered until zucchini is tender-crisp and liquid is evaporated.
Sprinkle squash with salt and chopped parsley and stir to wilt parsley. Add parmesan and stir until it melts, about 1 minute. Sprinkle mozzarella cheese over the squash, cover pan again and turn off the heat. Let sit 1-2 minutes until cheese is melted and serve hot.
This printable recipe from KalynsKitchen.com.
Lemon-Butter Snow Peas!
Lemon-Butter Snow Peas

2 ServingsPrep/Total Time: 10 min.
Ingredients
- 1/2 pound fresh snow peas
- 1 tablespoon water
- 1 teaspoon minced garlic
- 1 tablespoon butter, melted
- 1 teaspoon lemon juice
- 1/2 teaspoon Italian seasoning
Directions
- In a microwave-safe dish, combine the snow peas, water and garlic.
- Cover and microwave on high for 3-4 minutes or until crisp-tender;
- drain. Combine the butter, lemon juice and Italian seasoning.
- Drizzle over peas; toss to coat.
- Yield: 2 servings.
Editor’s Note: This recipe was tested in an 1,100 watt microwave.
Nutritional Facts: 1 serving (prepared with reduced-fat butter) equals 76 calories, 3 g fat (2 g saturated fat), 10 mg cholesterol, 40 mg sodium, 9 g carbohydrate, 3 g fiber, 4 g protein. Diabetic Exchanges: 2 vegetable, 1/2 fat.
Read more: http://www.tasteofhome.com/recipes/lemon-butter-snow-peas#ixzz39QeGrzn8
Subscribe to:
Posts (Atom)